Here is a little tutorial on how to make up three different types of wounds. To spice up any paramedic course or in the afternoon. (Caution! For people who cannot see blood)

Cut
Take some of the modeling wax and roll it to the desired length.

Then flatten the roll all around. So that a dome of wax remains in the middle at the end.
Now take the toothpick and pull it through the wax. This leaves the shape of the cut. You can then color the area around it with red make-up paint.


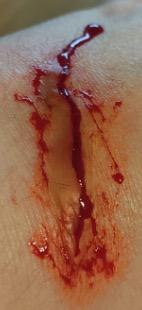
Finally, pour the fake blood into the cut. It may also run out a little.

Bruise
Start with the light colors first (yellow and green). Then choose the darker colors. Note that the darkest discoloration usually occurs in the center. It helps to take a close look at real bruises.
Combustion
Take a sheet of gelatine and a lighter. Hold the fire close to the gelatine so that bubbles form and it turns black in certain places.


Cut the burnt piece of gelatine according to your wishes.

You can then continue to make up the area with black, purple and red.

Finally, you can add a little fake blood on top.
Please note! This is a severe burn. For light burns, it is sufficient to apply red make-up to the affected area.
Material
Cut wounds:
- Artificial blood
- Toothpick
- Red make-up paint
- Modeling wax (suitable for skin)
- Make-up sponges
Burns:
- Leaf gelatine
- Lighter
- Red make-up paint
- Black make-up paint
- Purple make-up paint
- Water
- Small bowl
- Fake blood
- Make-up sponge
Bruise: (There are sets that have all the colors for bruises in one)
- Blue make-up paint
- Yellow make-up paint
- Red make-up paint
- Purple make-up paint
- Make-up sponges
Content may be automatically translated. Help improve the quality of the translation with your editing!