Two craft ideas that make a real noise and are fun for the boys.
This article is a Forum magazine article.
Handicrafts: Oriental mirror
Crafting is often neglected in youth groups. It's usually the male leaders who don't want to do it - especially as the amount of preparation is comparatively high.
This is a shame, because boys also enjoy crafting. There are a few, but important points to remember - and then it's fun for both young and old men!
It's fun when...
- ...it shoots
- ...it drives
- ...it swims
- ...it flies
- ...you can do something with the tools of the "big ones"
(hammer, soldering iron, saw, ...) - ...it has a function at the end (mirror, lamp, alarm system, fan, etc.)
Here is an idea that is not so complicated and boys are enthusiastic about it:
- Oriental mirror (for older children)
- Oriental mirror (for younger children)
Oriental mirror
(for older children)
Materials
- Mirror tiles (Migros or CoopHooby / sanitary department)
- Aluminum sheet (ask a company that processes sheet metal for leftovers) lDecoupage saw
- Hanger
- Glue (e.g. Uhu)
- Hammer
- Center punch
- Wooden base
- Double-sided adhesive tape
- Waterproof felt-tip pen
Production
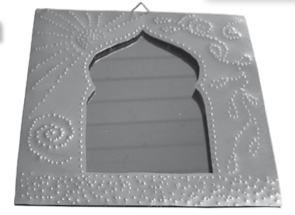
First draw the dimensions of the mirror and the oriental arch (or just a circle, rectangle or oval) with the waterproof felt-tip pen. The metal sheet is then cut to size with the decoupage saw and the "hole" is sawn out. Depending on the time available, this operation could also be carried out beforehand using a ladder. This reduces the working time massively, but remember: boys like to do this! They just have to be patient, as you can't get hold of ten decoupage saws for a boys' afternoon.
The next step is to draw patterns and ornaments with a felt-tip pen.
Now you need to place the metal sheet on a wooden base. Use a hammer and center punch to make dots along the lines you have drawn. The sheet will bend slightly over time. You can always bend it back slightly so that it lies flat on the base again. Continue in this way until all the patterns have been hammered.
Next, wash the mirror clean and dry it well.
Now stick double-sided adhesive tape to the back of the processed sheet. The sheet can now be glued to the mirror. The beaten dots are clearly visible as raised areas on the front.
Finally, use glue to attach the hanger.
(for smaller children)
Here is a second version so that smaller children aged 6 and over can also make a mirror:
Material
- Mirror plates
- Colored aluminum foil (stationery or craft store), cut to platelet size
- Paper template, cut to platelet size
- Napkins
- Pencils or ballpoint pens
- Adhesive strips
- Double-sided adhesive tape l
- Hanger
- Glue (e.g. Uhu)
Production
The children draw their patterns on a piece of cut paper. It must be clear on the paper where they can draw (edge of the mirror).
Each child gets a napkin. The aluminum foil is now placed on this napkin and the paper with the pre-drawn pattern is glued to the aluminum foil. It's best to stick everything down on the table straight away so that it can't slip away!
The children can now use a pencil (or ballpoint pen) to make dots (or lines) along the pattern.
When everything is dotted, the foil is stuck onto the mirror. (Elevations of the dots facing outwards)
Finally, glue the hanger to the back with glue. The mirror is finished!
Tip
The more children hammer, the more noise is produced. It is advisable to choose a room that absorbs a lot of noise or even better: hammer outside!
Source reference

- Content and picture: Forum Kind issue 2/10 page 17 Two craft ideas that make a lot of noise and are fun for the boys. © Copyright www.forum-kind.ch
- Author: Mirjam Leuenberger